If you haven’t read Sharing Perspectives in Photography: Composition, please check it out. It is well worth the read and gives some super cool perspectives on what a skydive photographer looks for in post-production. If you enjoyed the first article from Kian Bullock, you’ll love this one too! It’s all about style and light in photography (isn’t everything?!). So let’s get into it.
10 world-class photographers give examples of style and light in photography
Not everything has to be about skydiving
The first image for Part 2 was a clear favourite amongst our photographers. It is from Kuba Konwent and was shot at 92mm, F3.5, 1/800 and ISO 200. The original is well composed picking up a close foreground in the bottom right with a bunch of items for depth and detail throughout the image. The shot has used a flash to illuminate the subject and the histogram is split left and right of the center. This gives the editor the option to recover highlights and bring out the shadows.
“Looking at the pictures I see a very common path! Skydive photography largely requires a photographic look, which is simply obtained by taking pictures! Here we must feel and anticipate more than in classic ground photography. Now I, even more, appreciate the photographs of participants.”
KUBA KONWENT

Original image from Kuba Konwent showing diversity in the subject. It’s not all about skydiving

Kuba went for a dark saturated colour palette in his edited version
Chris Stewart loved this image because of the depth and it was something different from what he normally edits. Kuba decided to edit out the flash and pull the blacks in to give a dark saturated colour palette. He also pulled in the white point which has removed detail from the sky. This then allows the viewer to explore more detail of the image elsewhere. By doing so, he has also brought our attention to the people behind the fence at the centre of the frame.
*CLICK THUMBNAILS TO ENLARGE PHOTOS
-

- Chris Stewart

-
- Kian Bullock

-
- Steve Fitch

Cropping can make a big difference to the style of a photograph
For me, I wanted to anchor the shot from the right of the frame because of the rider moving left. Having the subject on the left of the frame made this difficult and a little uncomfortable for me. I tried various different compositions such as editing out the flash and including the jump. Ultimately, I felt the scales weren’t right to not overshadow the subject. In the end, both Steve and I went for the close crop with Steve removing the additional detail as he didn’t like the clutter of the pylons.
-
- Ewan Cowie

-
- Elliot Byrd

-
- Sam Millington

-
- Scott Patterson

-
- Tim Parrant

Looking at the other images, all of the photographers have anchored the image in the lower right using the out of focus foreground to create depth. Tim in typical style has used the contrasting highlights and shadows to go B&W with his edit. In contrast, the others have used white balance and contrast to focus on detail and bring out their preferred colour palette.
Sunsets are all about style and light in photography
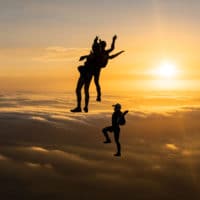
This next shot is one of mine (Kian Bullock) and was shot at 35mm, F9.5, 1/750 and ISO 400. It is into the sun so the subject is silhouetted and there is a natural vignette. I really liked the detail in the clouds and thought it looked like an ocean with small surface waves and the larger swell moving towards the subject. The subject itself is messy and I would have preferred if the two people weren’t overlapped.

Original image of head up flying with a gorgeous sunset as the backdrop. Kian Bullock

Kian Bullock’s final edited version of his photograph submission
For my edit of this shot, I immediately levelled the horizon as the setting is going to be relevant. I preferred the wider 7:16 crop as I always envision a photograph like this above a couch in a living room. I placed the subject central with the sun to the right and tried to balance that big cloud wave along the centerline.
-
- Elliot Byrd

Elliot felt that the background deserved a more central role in the final version of the picture. He comments:
“I wanted to present the subjects and background as equally important to the audience. I decided to give the subjects a horizontal offset from the center to give the appearance that they were on the move. This implies that they should not be considered the central focal point of the shot.
To achieve this in post-production I cropped horizontally to accentuate the lines in the clouds and the theme of the subjects traveling down a road. I also decided to turn up ‘Dehaze’ and ‘Vibrance’ substantially more than I usually do. This helped draw out the background colours more as well as create the desired contrast with the subjects.”
-
- Ewan Cowie

-
- Roy Wimmer

-
- Chris Stewart

-
- Steve Fitch

-
- Sam Millington
-
- Scott Patterson

-
- Tim Parrant

Looking at the other edits, both Sam and Scott have gone for the vertical crop. Sam chose to center the horizon and Scott placed the subject a little higher. Roy has placed the subject to the right with the lower person on the 2/3rd line. Like some of the other silhouette shots, it is always an option to enhance the shadow detail or leave it. Some will prefer to leave it dark to uncomplicate the shot while others might want you to see the detail in the jumpers.
“One thing that’s mind-blowing is everybody has a unique style of editing images and everybody sees things in a different way. If we all did the same things we’d be pretty boring.”
SAM MILLINGTON
-
- Kuba Konwent

I really liked Kuba’s edit of this one. The use of the heavy vignette focuses the viewer on the subject and the desaturation simplifies and enhances some of the detail.
Let’s run it hard and fast
Ewan Cowie has provided us with this image which was shot at 22mm, F7.1, 1/1000, and an ISO320. The histogram was balanced as best that it could be with the horizon not being burnt out. There is also detail in the subject if you wanted to draw it out. He submitted a number of really nice shots, but I chose to include this one as it brings up a number of points that I think are useful.
“While editing is a lot about technical knowledge, techniques and theory, it’s still a hugely personal thing, and subjective. I like my style, because it comes from within me, and the end result of a photo should be the creation that looks best to my eye.”
EWAN COWIE

Ewan’s original image gives plenty of options in post-production

Ewan brings out the colour of the sunset and highlights the detail of the jumpers in his final edit
What are the advantages of shooting in RAW?
Firstly, by shooting an image in RAW format you will give yourself more opportunities in post-production when it comes to recovering your highlights and shadows. What I mean by RAW is the larger data taken from your sensor that hasn’t been converted to JPEG. The file will always be bigger which may slow down your shutter speed if you are using a high number of frames per second. I would recommend learning to get better with your trigger control and shooting in compressed or uncompressed RAW format. This will give you more options in post-production.
How do you handle the balance and settings of the horizon?
Next is the setting and balancing the horizon. For me, if I want the viewer to consider the landscape or horizon as part of the setting/background then I immediately want to level the horizon. With this shot, if you level the horizon, you reduce your options and won’t be able to get everyone in the frame.
-
- Tim Parrant

A really great take on this image was from Tim. who has done that and therefore tightened the image and taken the viewer into the formation. He has then softened the image and made it black and white. When asked about it he said:
“I had to imagine the feeling of an evening jump so I imagined the flow of the jump being smooth and relaxing for them. That is why I made it softer to make the picture calm, and black and white because the colour wasn’t interesting. As a B&W there’s a nice contrast between the skydivers and the foggy background.”
-
- Kian Bullock

For my edit of this photograph, I abandoned the horizon and took the crop tighter. This was to remove the flyer at the bottom of the shot. It is sometimes a difficult decision to include or exclude a person from an image. To do so, you might be changing the experience, or excluding someone that was there.
Once I changed the crop I noticed there was a nice symmetry to the photograph. The leader could be placed in the center of the frame as the subject and the people around them became the setting. I enhanced the detail by bringing out the shadows and increased the white balance to give it more warmth. My preference is for detail and to desaturate an image. You can see this in this shot and I have used clarity and a micro-contrast filter to bring this out.
-
- Steve Fitch

-
- Scott Patterson

As you can see, Steve and Scott have opted to keep the lower flyer in the frame. Scott went for the Instagram crop of 1:1. He originally tried a 4×5 crop but it didn’t really work as he wanted. In the end, he decided to use a 1×1 crop and tried to get all of the people in. He also liked how the lower person’s body position went well with the line the eye follows through the photo. It is always nice to include more people in the shot.
How to enhance saturation in for style and light in photography
Similarly to Tim, Steve went with an alternate edit that is a little more artistic with the silhouettes against a deep orange sky. It really changes the feel of the photograph. When asked about colour saturation he outlined that it is very personal for him. He almost always enhances the photo until it looks too much. He then backs off and usually backs off a bit more by the end of the edit. A big thing for him is to straighten the horizon which isn’t always possible and trying to separate the subject from the background.
-
- Chris Stewart

-
- Steve Fitch

-
- Elliot Byrd

-
- Sam Millington

The Pyramids of Giza and Crossfire 3
When I think of my favourite photographs, they will generally be over a location that provides a background. Tim Parrant has provided this shot of the Pyramids of Giza. It’s shot at 51mm, F7.1, 1/640 and an ISO of 250. The histogram is smack bang in the middle with the sand providing a good colour for detail and the shadows on the pyramid providing depth.
When asked about the vertical composition Tim said:
“I want to have the photograph as large quality as possible. I generally won’t post a picture that is not able to print in high quality so this means you can’t crop a lot. Also, we now live in the era of Instagram so it serves as another purpose to not crop so much.”

A great location shot from Tim Parrant. Original image of our Crossfire 3 over the Pyramids of Giza

In Tim’s final edit, he has enhanced the shadow to give definition to the Pyramids. It provides the perfect backdrop to highlight the clean lines of the Crossfire 3
For Steve and myself, we went for the square crop. I felt that the subject and setting worked perfectly and the placement of the canopy in relation to the pyramid was spot on. The detail for me was the jumper looking at the pyramid that I tried to bring out in the shot.
-
- Steve Fitch

-
- Kian Bullock

The other shots are cropped a little more vertical with the viewer getting a greater awareness of the expanse of the area and adding context. Chris’s image stands out and when asked about it he explained that as he began to edit the image he wanted to bring out the detail in the landscape below. He wanted to highlight the wind-carved channels in the sand, the details of the buildings, and the epic Pyramids of Giza.
-
- Chris Stewart

He started by playing around with the contrast, increasing the blacks and details. By doing this it changed the colour to this deep rich almost reddish-orange. He corrected the colour but wasn’t happy with how it made the image feel. It made it lighter and gave it a softer feel. This isn’t his style or how he saw the image so he changed it back.
-
- Ewan Cowie

-
- Elliot Byrd

-
- Sam Millington

-
- Scott Patterson

Flying off into the sunset
The last image is another of Elliot Byrd’s. It was shot at 35mm F4, 1/1600 and an ISO of 400. The photograph is relatively balanced given it is taken into the sun. The focal point is spot on and the sun rays coming through the clouds is a great detail to bring out. For Elliot, this image presented another opportunity to give the background more weight than he usually does in most of his pictures. He wanted the audience to view both the subject and background as equally important and portray a broader theme. The solitude and beauty of canopy flight.
“I was the photographer for this shot and set up my framing to aid in portraying the vastness of the background compared to the subject while maintaining mostly a full-frame shot (minimal cropping). I wanted the subject to have a vertical offset from the center to show more of the foreground and appear that they were flying into the rays of light as well as portray that they were not the focus of the shot.”
ELLIOT BYRD

Elliot’s original image showing the canopy flight at sunset.

Elliot’s edit of a canopy flying into the sunset. A stunning photograph
For me, I immediately want to level the horizon so that the setting is correct. The item I notice next is the river at the bottom of the frame and the small boat and wake on the water. At this point, I can go for a wide panoramic shot which is my preferred style or go more vertical to show this detail. Of course, I go wide placing the subject just to the left (he is moving to the right), increase the micro-contrast and clarity, and try to enhance those rays of light.
True to Scott’s style, he has gone for the Instagram preferred 1:1 crop placing the canopy to the left and still capturing the light.
-
- Kian Bullock

-
- Scott Patterson

Use contrast and shadows to highlight sections
Roy has gone for a tighter crop and says that he tends to want to give his photos a feeling of warmth and of bringing people in. He goes on to explain that sometimes when a photo has dark parts to it we want to have everything showing, but less can be more.
If the focus of the shot is lighted correctly some aspects of the background, especially if they’re not particularly interesting ones, are actually best left dark to focus the eye on the central element. By using higher contrast and lower shadows you both avoid the dreaded grain and also allow the photo to focus on what actually matters.
-
- Ewan Cowie

-
- Roy Wimmer

-
- Chris Stewart

-
- Steve Fitch

-
- Sam Millington

-
- Tim Parrant

Conclusion to Style and Light in Photography: Sharing Perspectives
Firstly, we have an amazing community of very talented photographers that are open to sharing their perspective and having it challenged. I realised that I am a technical or structured photographer, concentrating on the subject, setting and detail, the settings of a camera, and composition that fits with the rules. I need to think more about the emotion of the moment and use editing to communicate a feeling.
This has also reinforced just how personal photography is and how it is a reflection of our individual perspective. If you have the opportunity to see or understand how someone has edited a photo, you can get a better understanding of who they are, not only as a photographer but maybe as a person too.
“I’ve definitely seen some of the photos edited by the others and thought they did a better job at some photos but in general I guess it has given me confidence in the general direction of my personal editing style and reinforced my commitment to keep developing and improving it.”
EWAN COWIE
Everyone sees things differently
In looking at the different images and how the person editing the shot has composed a shot differently to me, I have found myself asking what they saw that I didn’t and what detail did they want me to see and why. I feel I have a greater appreciation for other people’s style and light in photography and will get a better understanding of the person editing the shot by paying attention to that detail.
“I guess everybody sees things differently so I just do my best to make an image that I like and that I’m proud of, at the end of the day that’s all that matters really. Create art because you love it, not because of social media or other people’s opinions.”
SAM MILLINGTON
And that is it. To the photographers that helped with this project, thank you for sharing your perspective. It has been an amazing experience and has definitely challenged me. But it has also given me a greater appreciation for how I see things. For those that have enjoyed reading it, please follow the photographers and their sponsors, they allow us to share this great sport with you.
Give our contributors some love!
If you haven’t already, please check out our photographer’s social pages.
Sam Millington Instagram & Facebook
Ewan Cowie Instagram & Facebook
Chris Stewart Instagram & Facebook
Scotty Patterson Instagram
Elliot Byrd Instagram & Facebook
Roy Wimmer Instagram
Kuba Konwent Instagram & Facebook
Steve Fitch Instagram & Facebook
Tim Parrant Instagram & Facebook
Check out Kian Bullock’s previous blog article ‘How to take great photos‘
Follow Ki’s socials –Instagram & Facebook
Ki is a finalist in the Sony Awards again! Read more here & see the full gallery of finalists here